Tuesday, February 9, 2016

Valentines Day Nails

Well of course I'm going to get in on the holiday that represents my namesake (yes, my last name is actually Valentine, lol).  

For Valentine designs, I like a lot of pink, white and red.   So I searched YouYube and google for some cute designs.    "Cutepolish" on YouTube did this adorable pink plaid and hearts design, so I decided to try it out.   It wasn't all that great because my nails were soooooooo short.  But still, it was ok.  

This was around January 8th, 2016, right after I removed my acrylics and trimmed away all the damaged stuff, pretty much bringing my nails down to the quick.  

I had been using glue on nails and acrylic nails all through the holidays, to give me a bigger canvas to paint all those lovely holiday designs on.   But at this point, I had made the decision to forget glue-on fake nails and acrylic nails, and start growing out my real nails.  I began taking "skin, hair and nails" vitamins, keeping my nails moisturized with cuticle oils and lotions, and developing a good nail care routine, using a brush on treatment.   More about that later...

But this was how I started, using cuteness to cover up the lack of length, until they grew out.   I knew Valentine's Day would be the next holiday, so I wanted to have my own nails grown out enough for decent nail art by then.  

The next design was "kiss lips".  I simply painted a light pink base color, then used a tiny dotting tool to draw darker pink and red lips.   Building up a little bit of length, here...


Next I tried a different variation of "hearts and plaid".  I thought this one was adorable too, inspired by google images.  
  
Now this design, I saw online while searching for "conversation heart candy nail art".   I just thought conversation hearts would make cute nail designs, for some reason.   I found a really cute design, but the problem was, the original artist used a "stamping plate" with a conversation heart theme, which I did not have...   I also knew it would be a real pain in the neck painting all those hearts directly onto my nails (left and right hands), then going over them again to put the letters on.  So I figured a way around that....   

So I went to work painting little hearts in pink. purple, light green and yellow, on a plastic document protector.   Then I allowed them to dry overnight, and used a thumb tack needle dipped in polish to write cute little phrases on them.    
I was then able to peel them all up and to keep them from sticking again, I laid them over a cushion.  


I painted all my nails a hot pink color.  Then went to work placing the hearts on my nails in a similar pattern to the one I saw online.  I trimmed away any excess parts and pressed them down to secure them.    

Then I added a top coat and there I had it!   A cute design that got me a lot of compliments at work. 


My final Valentine design was this one-- red and white hearts.  Inspired by a YouTube video, of course.   Alternating red and white sections, with countering hearts.   Kind of reminds me of playing cards, lol.   But adorable, still.  


Minie Mouse Nails

I chose this design to make my extremely short nails look cute, while I waited for them to grow out a bit.   I got the idea from a YouTube user.   Paint a simple base color of pink.   On the middle finger, use a dotting tool to make a large dot int he corner of the nail, for Minie's head.  Then 2 smaller dots on top for her ears.   use a tiny striper to paint 2 tiny triangles in white, with the points touching in the middle, as her head bow.   On the other nails, dip a dotting tool in white paint to make polka dots.  Adorable! 


Black And White Polka Dots

This was a cute and simple design I saw on YouTube, using a nude polish, white, black and silver.   Only a dotting tool was needed.   So easy and quite elegant! 


Start off with a base color of nude polish.  Or you can simply keep your natural nail color.  


Paint the right corner of your nail white.

Paint the left corner of your nail black, overlapping part of the white in the center.  


Use a dotting tool dipped in black polish to make 4 or 5 black dots above the white section of the nail.   Then do the same with silver polish, but this time go over the black section of the nail.   If the sivler dots cover one o the black dots, that is fine.  


Finish with a fast-drying clear top coat, and you're done!  
 

Cinderella 2015 Nails

This design was inspired by the 2015 movie Cinderella movie.   I absolutely ADORE the crisply faceted look of the glass slipper int heat movie, and I thought "Wouldn't it be cool if I cloud paint that slipper with a dark background (the way it is depicted in a lot of the photos online) on one accent nail, and make the other nails like a see-through glass with a sheer, bluish tint?   So I searched YouTube for ideas, and I found a design by NailedItNZ. 

She did an excellent nail design of the 2015 glass slipper.   I was soooo jealous of how cool it looked and wanted to re-create that.   So I studied her video.   Then watched another video of a sketch artist actually drawing this same exact shoe, to get an idea on lines, angles, facet cuts and colors....   I drew a tiny version of this shoe, freehand, on some paper.  Then put it behind a plastic document protector and went to work painting over the design on the plastic.   I basically made a "decal" using clear top coat as the backing, then painted the slipper over that.   I used a TINY detail brush to paint the outline of the slipper and the facet cuts.   Then I used a tiny dotting tool color in the tiny sections with dark and light blue, to give it that  sparkling "faceted" illusion.  

For the nails, I used clear acrylic tips, for that "see-through glass" effect.  I didn't have a sheer, light blue.   To I mixed clear polish with blue, and made my own.   Painted that over the other nails.  Then taking inspiration from a Robin Moses Cinderella nail art design, I painted magic swirls and twinkles with a detail brush on the other nails, using white and silver polish.  

Looking back now, I wish I had made the other nails an even lighter sheer blue, and maybe covered less of them with the magic swirls, so the glass effect would have been more noticeable.   But I think they still turned out quite nice. :) 


Starry Night Nails

This idea came from a YouTube User, but I can't remember which one.   She painted her nails a dark blue, then went over that with a sheer blue with blue glitter.  She added gold stars for a sparkle effect.   I didn't have a sheer blue polish with blue glitter.  So I mixed solid blue with clear, and stirred in some blue glitter I had from a glitter set I bought in Walmart.  Then of course I used a striper dipped in gold polish for the stars and finished with a clear, fast-dry top coat.  

Work with what you have!   :)


Christmas Nail Art

There were so many beautiful, fun and cute Christmas designs to try, it was difficult to decide!  But after a lot of web browsing, these are the ones I chose: 

Design 1:   Candy Cane Stripes

For this design, I Painted a base color of white, then used painter's tape cut in wide and this strips.  I placed them in candy cane-like patterns across my nails, pressing them down firmly.  Then painted red polish over the top and peel the tape away to reveal the stripes.  

Now...   The KIND of polish you use for this matters.   The first time I tried this, I used a rather thin red by China Glaze, and for some reason, no matter how hard I pressed to secure the tape, the red would bleed under the tape, smudging all the lines...    I had to go back and fix the lines with a white striper.   So I would strongly recommend using a thick, opaque red for this.   And an equally thick and opaque white. Thin polishes just tend to bleed together too easily. Allow the white to dry completely, before applying the tape, or the red polish.     


Design 2:  Grinch Nails

This one was really quite fun!  But...   I had to combine 2 different designs together.   I liked the Christmas lights from one Grinch design, but the face from another.   I studied how the Grinch face was painted, and even practiced a few times on paper first, before attempting it on my nails.   When painting with my non-dominant hand, I had to go super slow, and mostly move my dominant hand, instead of my non-dominant one.    But they both came out great.   The designs were painted over a base coat of nude polish, with white French tips.  


Design 3:  Wrapped Presents

This one was actually fairly simple, yet elegant.   Just a base color of alternating red and green, and I used a small, thin brush to paint a gold criss-cross, then gold bows.  people LOVED this one!


Design 4:  Christmas Skittle

Oh you know me by now, I love a good holiday skittle design!   I wore this design for about 2 weeks during the month of December (the others I wore maybe 5 days?).   These were actually a combination of about 8 different designs I found on YouTube and google.  I simple chose one favorite for each nail.   Something to represent every part of Christmas.  

So on the right hand you have:  Rudolph, ginger bread man, holly with a gold background, snowman body, and I kept one of my wrapped present nails on the pinky, from the last design.

Then on the right hand, you have:  Santa's suit, Christmas tree, Elf outfit, candy cane and a snowflake.   These were such a big hit!   So much fun to show off.  


Design 5:  Christmas Poinsettias

I have always absolutely LOVED poinsettias, they are my favorite Christmas decoration.   I borrowed this idea from Robin Moses on YouTube.   Again, mine is nowhere near as clean and elegant as hers, but they really caught attention.  Most people loved them.   I followed Robin in using a shimer/pearly white for the background (it was softer and more elegant than a plain white), and both dark and regular red for the petals of the flowers.   Then gold glitter for the yellow center.   The thumbs and pinkies are a red base color, with golden ribbons winding through.   


Thanksgiving Nail Art

Thanksgiving may not be as big as Christmas or Halloween, but it is our favorite "Turkey Day" and it brings families together.   So I looked for designs to try that represented Fall, turkey feasts and pilgrims.

Design 1:  Fall Leaves

This was my very first Ombre design.  Ombre is when you start with a white base color to make your design really stand out.  Then paint 2 different colors in stripes across the edge of a makeup sponge, and repeatedly blot those colors over your nail to create a "blending color" effect.  For this design, the original artist (and I) used orange above yellow, to represent a Fall "setting sun" skyline with brown leaves drifting about.  The orange I used was actually lighter than the orange used by the original artist (mine was a cream, but she used more of a burnt orange).   I was still happy with the results, though.

However, when you do an ombre design, blotting paint with a sponge over your nails gets A LOT of paint on your skin!   Clean up was a bit of a pain, having to dip a Q-Tip in some nail polish remover and rub the polish off my skin.   That was the only part I really hated, lol.    I wish I had one of those peel-off coatings you can paint around your cuticles and finger tip so you could just peel the mess away.   One of these days I will get some.  But this design was a hit, especially at work (I work in retail).  A lot of customers noticed them and I got a ton of compliments.  


Design 2:   Turkey Nails

This design was pretty easy, from YouTube.   Just a white base color, and a tiny brush to pain the "feathers".   The rest of the work was done with different sizes of dotting tools (the turkey's body, eyes and beak).  These were also an attention grabber-- that white background really catches people's eye and when they look closer, they delight in the cute turkey design.


Design 3:  Water Marble Turkey

This was my first ever attempt at "water marble" nail art.    What is water marble?  Well...   Its a technique of dropping different colors of polish into a water cup/dish and using a needle or tooth pick to create designs in the paint, then dipping your finger into the design.    The design sticks to your nail when you remove it from the water, and you have an awesome design that would be difficult, if not impossible, to paint free-hand!

Again, I got this design from a YouTube video.   Basically, the water marble is being used to create the turkey "feathers".  Then the turkey body and face are painted free-hand.

So for anyone else interested in trying water marble, let me offer you a few tips that will make your first attempt a success.   I got all these tips from a water marble do's and dont's video, and I can honestly say that video was probably the only reason my first try was such a success and a positive experience.  Too many people write off water marble as "too hard" or impossible, because they didn't know these simple tips:

1.  Use a SMALL water container.   A narrow cup is best.  It wastes less polish and the polish won't have to spread so much, or be too thin.

2.  Use ROOM TEMPERATURE water.   Distilled or bottled / filtered water is best, because the stuff coming out of the tap has things in it that mess up the quality and spreading of the marble design.   Also if the water is too hot or cold, it can ruin the design. 

 3.  Use thinner polishes.   Thicker ones don't spread as well and can sometimes sink to the bottom.

4.  Keep the brush VERY close to the water when you drop the dot of polish.   Dropping from too far up can cause the polish to sink to the bottom, or not spread.

5.   Work quickly!   Keep the caps/brush handles unscrewed and open on all your bottles, to help you switch colors faster.   Working quickly is the big key, as leaving the colors to set too long will allow them to dry and make the polish impossible to work with.

6.  Drag a needle or tooth pick through the rings of polish, to create a design.   When you go to dip your nail in, your nail should face DOWN, directly over the part of the design you like best.

7.   Keep your nail under the water, while you clean up the surface.   To do this, use a Q-Tip to sweep up the extra polish out of the water and away from your finger, on all sides.   Blow on the on the extra polish before sweeping it up.   This will dry it and make it easier to sweep up.   If you don't get rid of the extra polish, it will stick over your design when you pull your finger out of the water, and ruin your design.

Ok, now that you have all the important tips, here is how to water marble!

Paint your nails white, to make your marble design shows up nice and clear.   Then put some tape around the sides, tips, front and back of your fingers, to protect your skin from the polish and make clean up much easier.   You can also use a peel-off, like liquid latex.  Cover everything except the surface of your nail, as much as possible.


Have your water in its container and loosened/open polish bottles ready.   Its best to only work with 2 or 3 colors in marbling, but not more.   I didn't use all of these colors in the marble; some of them were for hand painting the Turkey features.   Basically, for the feathers, I used solid/opaque/cream colors of yellow, orange and brown.


Drop your polish on the water, placing one color dot inside the other.  You will notice the lighter colors and thinner polishes spread faster than the darker and thicker polishes.   For this reason, its best to alternate lighter/thin polished with dark, to help the darker ones spread.    Drag a needle or tooth pick through the rings of polish to create a design.   I drug mine toward the center to create rounded shapes like fanned out feathers. 


Dip your nail into the polish, following the tips above and keeping your nail face down.   Try to aim so that your favorite part of the design will be on your nail.  While you hold your finger under the water, sweep up the extra polish with a Q-Tip.  Remove your nail from the water to see your design.


Peel the tape off your fingers, and clean up the edges of your cuticles, either with a Q-Tip or a small flat brush, dipped in nail polish remover.   Try not to wipe any color off your nails, as you do so.  Its best to use as little nail polish remover as possible, because completely soaking the Q-Tip / brush can cause the polish remover to run onto your nails and damage your design.   Try not to touch your nails as you clean up.   


Finish with a clear, instant-dry top coat to protect your design and add a nice glossy shine, and you're all done!


Design 4:  Thanksgiving Skittle

For this one, I looked around online for designs that included a little of everything to do with Fall and Thanksgiving-- turkey, pies, pilgrims, leaves.   I found a good one on google images.   This was a lot of fun to do!   On the thumb, we have a pumpkin pie with whipped cream in the middle.   Then a pilgrim hat, lattice crust cherry pie, a turkey, and some Fall leaves.   Adorable!  I wore this one for the last week of Thanksgiving and it got a lot of attention.  


Monday, February 8, 2016

Halloween Nail Art

As mentioned in my introduction, when the holidays started coming on, I used them as an excuse to try all sorts of different nail art designs.   Most were re-creations I did of other people's designs on Google Images, or YouTube.  If you see one of your designs on my nails, please give me a shout out!   All the designs were fun and interesting for me to do, and really kept me in the "spooky" spirit!

Design 1:  Halloween Skittle

I particularly loved this "Skittle" design.  For those who don't speak nail art-- skittle is when each nail has a different design, but the same theme.  Or the same design, but different colors.   Or the same colors, but different design.   You get the idea.  I got this design from a video by user "cutepolish" on YouTube.  I really like her designs, and I highly recommend her as a teacher for beginners.   She is very good at breaking popular designs down into simple methods. 

I did have trouble with the Mummy; I had to re-do it.   I also had to re-do the Jack-o-lantern, because the first time I used the wrong orange, it was too dark and gel-like, too sheer.   I could barely see the face.  So the second time, I mixed a bit of white into it, and I came up with a pale, cream orange.  Perfect! 

Then like I said, the Mummy...   Well the first time, I goofed up on the lines and angles.   It was a complete mess.  the lines were running together, it really didn't look good.   I actually rushed through it, and that's such a no-no.   You should always breathe and take it easy when doing nail art.   See, the white base color application wasn't smooth, because I was trying to use a striper brush to paint it on.  My white Kiss polish with a striper brush was all I had!   Trying to cover your whole nail a solid white with regular brush (Sinful Colors, very cheap at Walmart).  That was a nice solid white, opaque, and went on smooth in a single fluid coat.    Then the black stripes I painted on with my Kiss black striper polish went on smoothly.  

On the right hand, that tobstone/graveyard scene...  The original artist did an obre for the sky color, blending pink at the bottom up to purple at the top, using a makeup sponge.   At the time, I didn't have any sponges in the house, so I just used plain light purple.   But I think it still came out nice.   


Design 2:  Halloween Candy

Ah, m&m's!  One of my favorite candies.   But why did I put this with the Halloween designs?  Well, I was going with a "Halloween Candy" theme.   On my left hand, I had m&m's.   On my right hand, I had Candy Corns.   When I was a kid, I used to love getting those miniature packets of m&m's in my candy bag during Trick-Or-Treating.   Actually, as soon as I got home, I would sort my candy.  First thing I did was sort my candies in little piles from my most favorite, to my least favorite.   Chocolates were put in the "absolute favorite" pile.   Then things like caramels, suckers, gum, gummies, pop rocks, Nerds, butter scotch, candy corns, etc. went in the "these are ok" pile.   Finally, plain old hard fruit candies (like Jolly Ranchers) or other fruity candies went in the "I'll eat these if everything else is gone and I'm desperate" pile.   lol. 

The m&m's were not as hard to paint as I thought they would be.   Again, they were a "cutepolish" design.  She broke it down in easy steps.  For the M-- 3 lines, connect the tops with M-like arches on top, then draw straight little lines on the bottoms of each line.  Use your polish brush to paint a rounded color dot on your nail.  

The candy corns were even easier.   I've seen people layer the colors in many different ways.  But I chose to work from top to bottom, in layers.    I painted the entire nail yellow.   Then used the regular polish brush to paint a yellow stripe across the middle.   Finally a white strip across the tip.    I didn't need any tools or guide strips with this method.  


Design 3:  Tiny Spiders

Expect for the solid orange background, this design was done almost entirely with dotting tools.   A black dot for the spiders. Two smaller white dots for their eyes.   A tooth pick to make their tiny legs and white dots in between the spiders.   Since these are babies, I'm guessing the white dots were meant to be...   Eggs?  I don't know, lol.   The original Youtube artist had much longer nails than I did.   So I was trying to cram this whole design on my tiny, short nails.   But I think I did ok.  


Design 4:  Jack Skellington

Another "cutepolish" design, super easy but great for Halloween!  The original artist started with a black base coat on the striped nails, and used white polish and a striper brush to add the stripes.  But I did the opposite, starting with a white base coat and adding black stripes.   I try to avoid lack base colors as much as possible, as they are very difficult to remove.   But as you can see, the results were pretty much the same and looked quite nice!


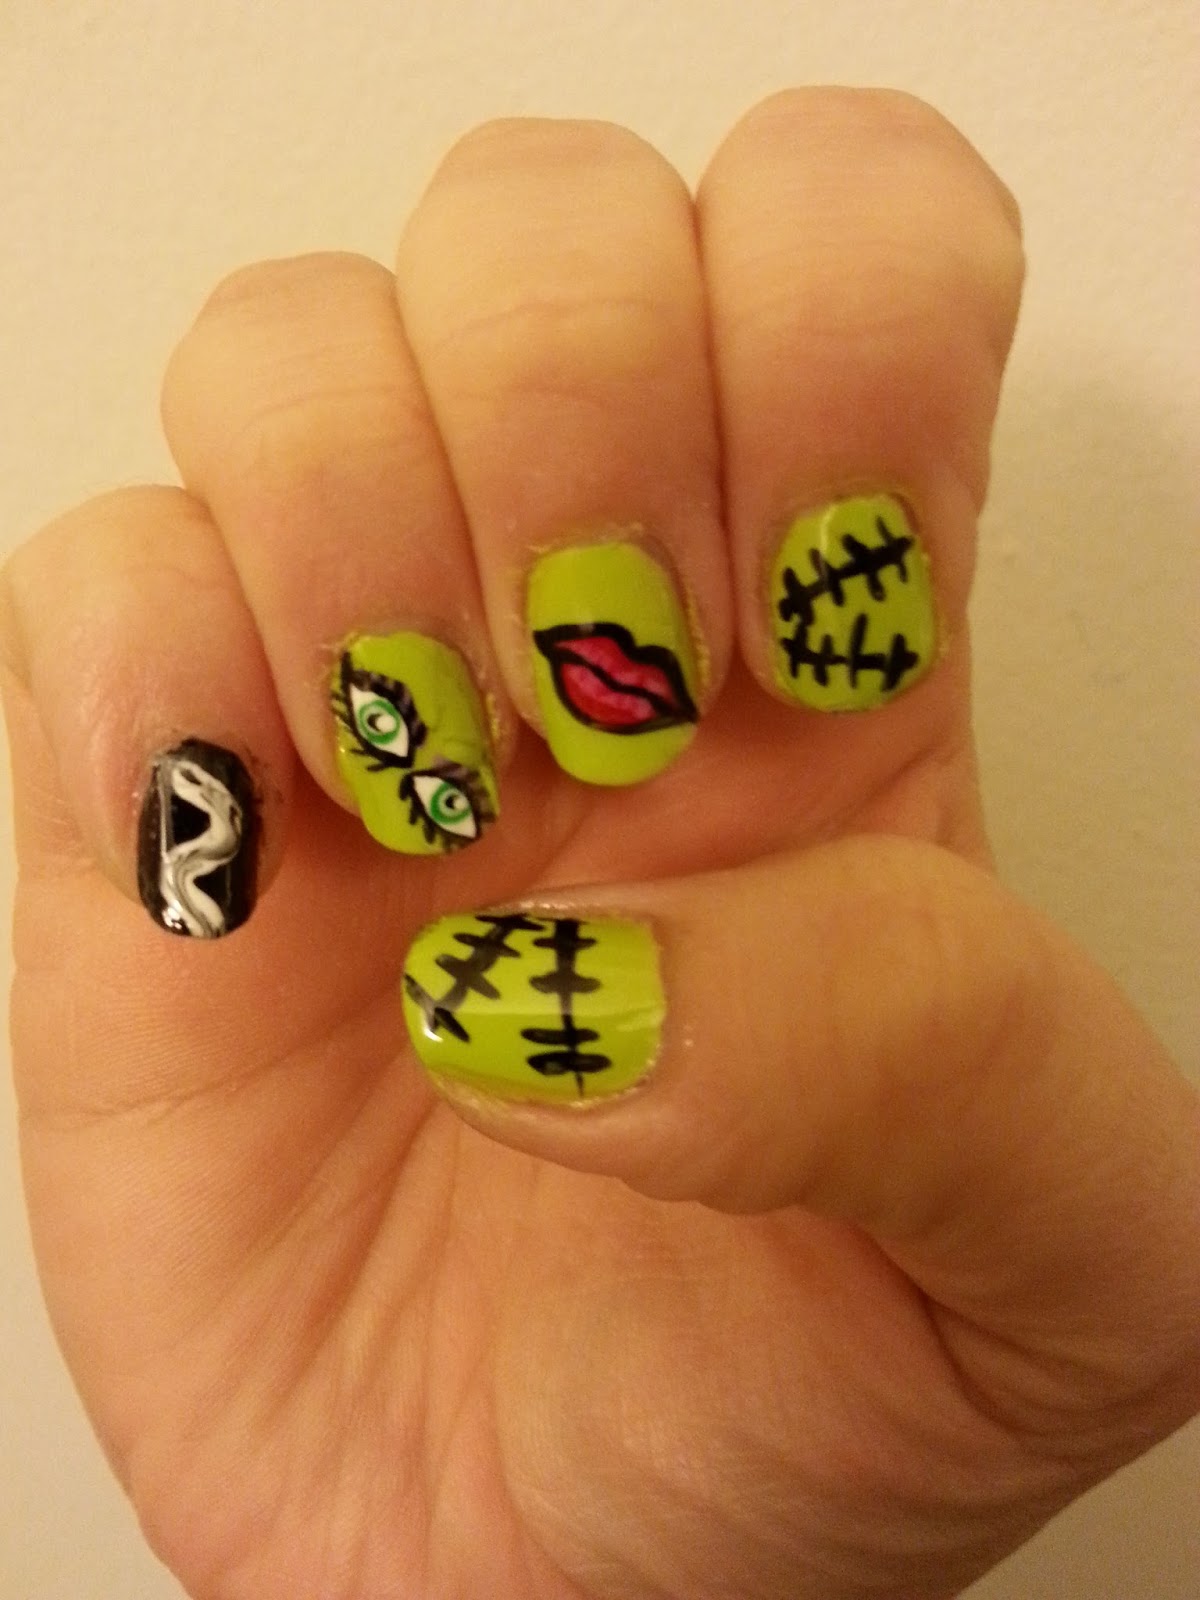
Design 5:   Glowing Pumpkins and Frankenstein's Bride

These two designs (one on the left hand, one on the right hand) I borrowed from Robin Moses on YouTube.   While "cutepolish" is my favorite nail artist for cute and simple designs, Robin Moses is my favorite for more complex designs.   She is sort of my "nail art idol", lol.   This woman can literally paint a realistic, detailed portrait on a single fingernail!   That takes an insane amount of talent and she certainly has my respect.  

I totally fell in love with her Glowing Pumpkins/Frankenstein's Bide design, because I loved the way she made the pumpkin faces look like they were really glowing!   So spooky with the black background and the facial features, lined first with red, then orange, then yellow, for that "fire" effect.   My nails are sooooo narrow, unfortunately.   They were also short at this time.   So I was unable to get a nice, neat design, or capture the whole effect.   But for a first attempt, it was ok.

The Frankestein's Bride is what I was really excited to do.   Again, I'm nowhere near as good as Robin...   But everyone has to start somewhere, right?   Also, I did goof up, I put the lips and eyes  going in the wrong direction, lol.   Its supposed to be as if her hair is at the top (pinky) and her eyes and lips are in order below that.   I didn't paint eye shadow, or the eyebrows over the eyes.   I couldn't get the arch right.   I just REALLY wanted to paint those eyes!  I saw them on the video thumbnail, and I was like "Wow!   How did she paint such detailed eyes?!"   After watching the video, she broke it down-- it was mostly dotting tools and layering different colors of dots, one color over the other.   I wanted to see if I could to it, and I think I did a pretty good job, even if there are no eyebrows, or eye shadow, lol.  


Design 6:  Black Flames and Spiders

The original artist on YouTube did this design as her take on "inclinations after being bitten by a spider".   There were layers of purple, blue, orange and golden hughes, with black flames swirling up through them and a spider on every other nail.   I loved the look in her video, but I actually wasn't too happy with my results...    Mostly because her nails were REALLY long, so there was a ton of room to really capture the design and all those lovely colors.   But my nails were sooooo short, so I was trying to cram all those colors and layers on a tiny space.   I guess I did "ok" working with what I have.   But everything is so tiny and mashed together, you can't really tell what it is, lol.   I ended up wiping it off literally an hour later and doing the below "stitches" design, instead.


Design 7:  Stitches

So I'm guessing this design is going with the Frankenstein theme?   Like different parts stitched together.   I just loved how basic it looked, and how cute it was.   Again, I got this idea from a YouTube user.   I followed her instruction and cut some painter's tape in long, tapered angles.  I painted the entire nail purple, let it dry, then placed the corners of the tape across the middle of the nail.   This theft the areas above and below the tape exposes.   The area closest to my cuticles, I painted green.   The areas at the tips, I painted orange.   I peeled the tape off and voila!  3 different colors, with clean lines.   Then I took a black striper and painted a line along the edges of the colors, and painted stitches going through the lines.   Turned out great and it was a good design for even short nails. 


Design 8:  Spiders And Polka Dots Skittle

Another Skittle design, with Halloween colors, I saw on YouTube and wanted to try.   I LOVED how the dots just seemed to pop!  But there was a trick to that, explained by the original artist:   First, Make all the dots WHITE.   Wait 5 minutes, then go over some of them with light purple and yellow.  this makes them more visible and bright.   Otherwise, if you simply paint them over the dark purple polish, they will barely be visible.   For the other nails, white or light purple base colors, webs and spiders.  use dotting tools of varying sizes to make the spiders and their eyes.   Same technique for the eyes, first a white dot, then go over with yellow to make the yellow show up.  Black pupils with a tooth pick tip.